Monday, December 3, 2012

Makeup Final Link

Here is the link to my Makeup Final process.  I hope to keep Makeup Sex running until I retire from performing, or until the entirety of the internet expires, but just in case this ends up being my last post, thanks for checking in.
x

Saturday, December 1, 2012

Moustache (and Eyebrows) On My Face!

I have to say, when I first knew moustache day was approaching I got very excited.  I had to many moustaches I wanted to make:

But as the class progressed I realized that I if I was going to make one, it couldn't be a reproduction of someone else's fake moustache (Sorry, Matty, but I know you those aren't real).  So!  Let the research begin!
Sadly, in the end, it didn't even matter, because we were given a template and that was that.  Oh well.
The very first thing that needed to be done was to make the moustache and eyebrow hair.  No head of hair is just one colour, so, using two different colours,
I blended and blended, and blended some more until there appeared to be a bit of an even blend.
Then, on an acetate, with the template placed underneath, a thin layer of latex was spread all around the area of the eyebrows and moustache.

Next, wig lace was gently pressed over the latex and left to dry.  After that, another layer of latex.  Once dry, and working from the bottom up, the hair fabric was thinly pressed into a layer of latex at a time.  One must be sure that the previous row of latex is dry before another is applied or the lower layer will never dry.

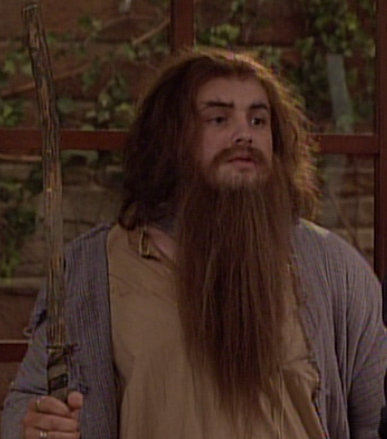
I let them dry for about two days, and then returned to apply them.  Putting on a quick and rough looking old age makeup first,

Side note, don't put makeup on the skin where the appliances will be applied.


then, carefully cutting out the eyebrows and moustache without destroying any of the hair, the acetate should still be on the back.


This next part might be frustrating, but *very* carefully peel the acetate backing off of the latex and lace without destroying the edges of the appliances.


Now, placing a thin layer of latex on your own eyebrows and spirit gum on the back of the moustache, once tacky, the appliances can be placed on the face.


This is by far, without a doubt, my favourite assignment in the class.  Hands down.  Thanks to this lesson, I have a pair of eyebrows and a moustache that can allow me to cos-play as a dwarf from Lord of the Rings, a god from Clash of the Titans, Plays With Squirrels from Boy Meets World, or the ogre from Time Bandits.

Thursday, November 29, 2012

Boo-Boo On My Face (And More!)

This was a fun mish-mash hodge-podge of a class!

First we covered our eyebrows (or tried, for those of us with thick and dark eyebrows) with glue:
Attempts 1

2

And Christina Ricci
 Above you'll see that there's some yellowing under my eye.  That's because we were trying to recreate this shiner:
The broken capillaries really bring out the blue of his eyes.
We were also trying to recreate a gash on latex based off of this lovely picture:

And then we applied it over the bruised eye:
I made mine too big, but in all honesty, I was under the impression these were going on the back of our hands
 And then we had to take them off!  Wee!

Wednesday, November 28, 2012

Surrealism On My Face

The most difficult assignment, thus far, this semester, was transferring the painting "Bride" by Marcel Duchamp on my face.  It consisted of a lot of tracings:

and then transferring that onto my face:
Adding green stick and then base to your lips makes the colour disappear perfectly


And then very carefully mixing/matching colours and painting in the lines:


I was the one who took the longest in the entire class (three and a half hours), but I was pleased with the results and I felt my time was not wasted.


Friday, November 23, 2012

Obesity on My Face

Using the Fatify Me app on my iPad I got an image of how I would look "fat" :
Based on that, and focusing on highlights, this was the process:


I definitely think the most successful part of my face that was given weight to was my chin and then my nose.

Thursday, November 15, 2012

Emaciation On My Face

Some basic pictures of emaciated individuals as research:


I also found this nifty little chart that shows where to place highlights and shadows.  Obviously my face is not the same as the picture, so I couldn't copy it anyway, but the reasoning behind putting lines and shadows in certain places was very helpful to back up the primary research:

Now comes the part where I put it on my face!
The lines denoting where things need protrude or disappear the most

The shadow to sink the skin

The highlight to raise the bones

The finished product
I think I ended up looking more like a street urchin, but hey, now I can be in costume when one of my friends drags me to see the new "Les Miserables" movie.

Monday, November 5, 2012

Ageing the Face

Ageing my face isn't new to me, but the line of products being used are, and I believe they yielded a much more realistic illusion.  But first, some research pictures needed gathered:
Age 50

55
65
77
79
83
Now that I can study how others age when I use an ageing application on my iPad of my face I can sketch the most realistic combination and get this:
Based on the sketch, I can begin transferring the lines.  No basic correction need be applied when ageing oneself as oneself, because anything one would cover will naturally actually intensify overtime. (Example, the dark circles under my eyes.)


Next comes highlighting:
And then some shadowing:

 And a little whitening of the eyebrows: